Table of Contents
Connecting your site to CDN allows you:
- speed up your website's loading time in different regions;
- optimize images on your website on the fly;
- significantly reduce outgoing traffic from your server;
- reduce the number of requests to your server;
- reduce the cost of AntiDDoS for your server.
All this is achieved by automatically transferring cache copies of images, styles, and scripts to numerous cdnnow! CDN servers.
Creating a CDN Account
If you don't yet have a cdnnow! account, submit a CDN activation request, by providing your email, website, and CMS.
You will receive an email with access to your Control Panel and a default CDN address for your project in the format userXXXXX.nowcdn.co or userXXXXX.clients-cdnnow.ru, where userXXXXX — is your unique identifier.
- It is recommended that you make a backup copy of your CMS and database before starting the integration. These instructions have been tested for the default Prestashop theme; results may vary if you are using a different custom theme.
- Log into you Prestashop admin panel (back office).
-
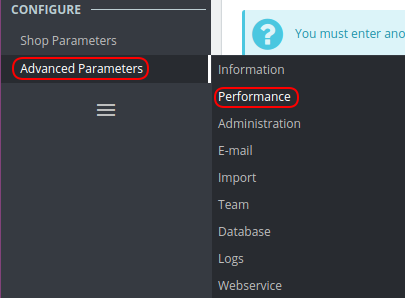
Go to «Advanced Parameters / Performance».
-
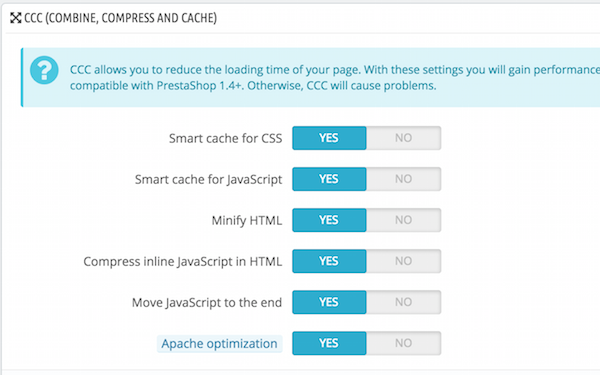
Scroll down to the «CCC» (COMBINE, COMPRESS AND CACHE) section.
Set all the options to Yes.
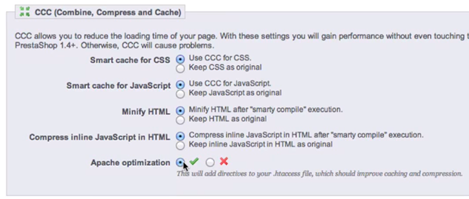
Or, in older versions, it looks like this:
- Save the changes in the block by clicking the «Save» button.
-
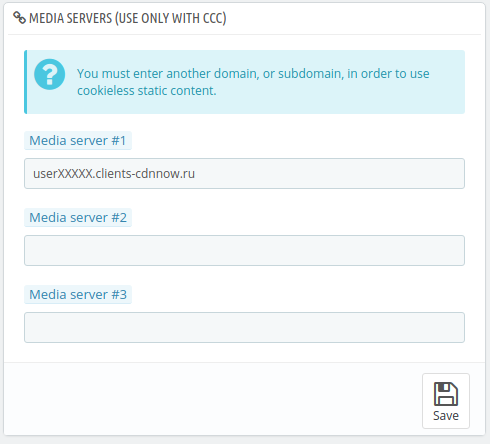
Scroll down to the «Media servers (use only with CCC)» section.
-
In the «Media Server #1» field enter the CDN address
userXXXXX.nowcdn.co,
where userXXXXX is the service name of your project in your
cdnnow! personal account.
-
Or you can enter your subdomain for CDN (you need to
configure it first):
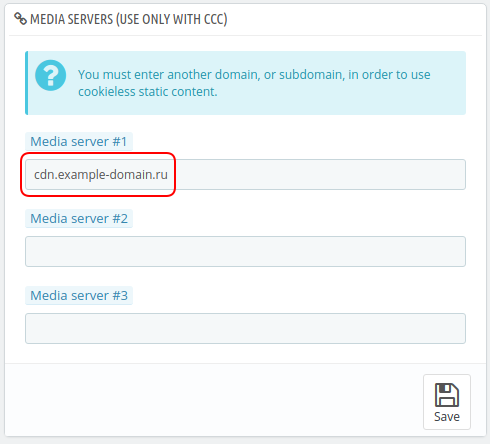
- Save the changes in the block by clicking the «Save» button.
-
In the «Media Server #1» field enter the CDN address
userXXXXX.nowcdn.co,
where userXXXXX is the service name of your project in your
cdnnow! personal account.
-
The address of static files in your website's HTML code should change.
Reload your website and view the source code; you should see new URLs for static files.

This completes the Prestashop configuration and the CDN is ready to use.
Attention! If you were unable to configure the CDN for your custom theme, restore the previous settings in the «Advanced Parameters / Performance» section.
See also:
- Use your own domain for CDN
- Image optimization settings
- How to cache other file types (other extensions)
Cost of CDN services
We provide a free 7 days trial for all our new clients. When you get access to your personal account you also get unlimited access to CDN and image optimization features. During the trial period, you can thoroughly test the download speed; we do not limit the functionality for trial accounts.
If you like our service and are ready for long-term cooperation, we will convert your account from trial to normal.
The cost of placing data in CDN depends on the amount of traffic. You can check your traffic usage during the trial period in your personal account in the “Statistics” section and calculate how much traffic is expected per month. In this section, you can see the volume of requests for image optimization, if you have enabled this feature.
Prices
Starting at $8/month — includes
1000 GB. Unlimited projects
Minimum monthly prepayment of $8. Includes 1000 GB of traffic.
Excess usage is billed postpaid on a tiered pricing model. Enter your monthly traffic volume in gigabytes.
Each plan includes up to 100 000 optimization requests per month
then $1.12 / 10 000 requests
If you have any questions about setup, maintenance, or pricing, you can always contact our support team:
- Email: sales@cdnnow.pro
- The chat at the bottom of the page