To deliver content through the CDN, you can use the default cdnnow! domain or your own custom domain.
Practice shows that a custom CDN domain (based on your main website's domain) is better recognized by search engines and improves performance metrics in tools like Google Chrome Lighthouse.
Let's walk through how to set up your custom CDN domain instead of the default one.
Creating a CDN Account
If you don't yet have a cdnnow! account, submit a CDN activation request, by providing your email, website, and CMS.
You will receive an email with access to your Control Panel and a default CDN address for your project in the format userXXXXX.nowcdn.co or userXXXXX.clients-cdnnow.ru, where userXXXXX — is your unique identifier.
Using a Custom Domain for CDN
If you want to use your own domain for files delivered through the cdnnow! network (e.g.,
cdn.example.com)
instead of the default CDN project address (
userXXXXX.nowcdn.co or userXXXXX.clients-cdnnow.ru),
follow the instructions below.
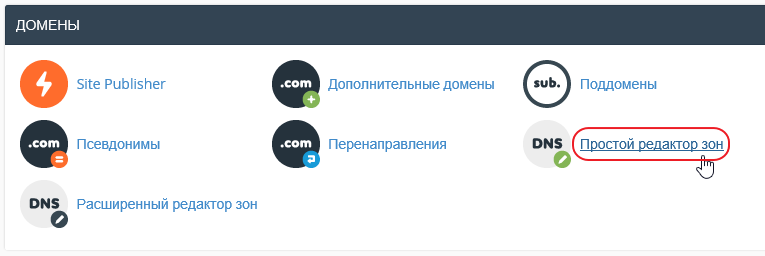
- Go to your hosting/VPS control panel. The screenshots below use the cPanel hosting panel as an example.
- Open the DNS Zone Editor and Add a new CNAME record.
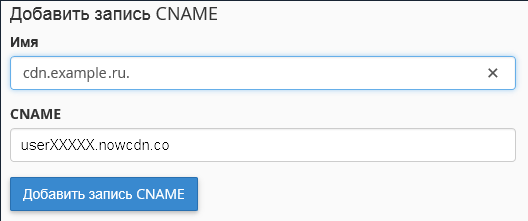
In the «Name» field, enter the subdomain you want to use for the CDN. Important: some control panels automatically append your domain name and a trailing dot. In this case, simply enter cdn.
In the «CNAME» (sometimes called «Value») enter your CDN project address in the format
Save the changes.userXXXXX.nowcdn.cooruserXXXXX.clients-cdnnow.ru(use your specific address from the cdnnow! Control Panel). -
The new CNAME record will appear in the records table.

DNS propagation may take some time (from a few seconds up to 72 hours).
-
In the selfcare.cdnnow.pro control panel, navigate to «Projects». Then, select your project by clicking its name in the projects table.
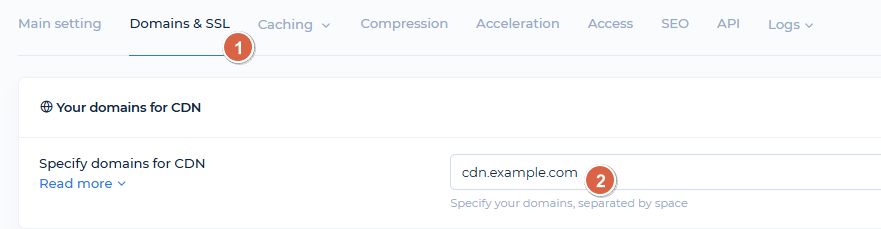
- On the project settings page you'll find several tabs. Go to the «Domains & SSL» tab.
-
Enter your CDN domain in the field. If you have multiple CDN domains, you can enter them
separated by spaces (each must have a corresponding CNAME record).
Save the changes.
Free SSL Certificate Issuance
- Below, you will find the SSL certificate management section. If your website uses
HTTPS, you must issue or add a certificate for your CDN domain.
Here, you can generate a free Lets'
Encrypt certificate, which will automatically renew every three months without your intervention.
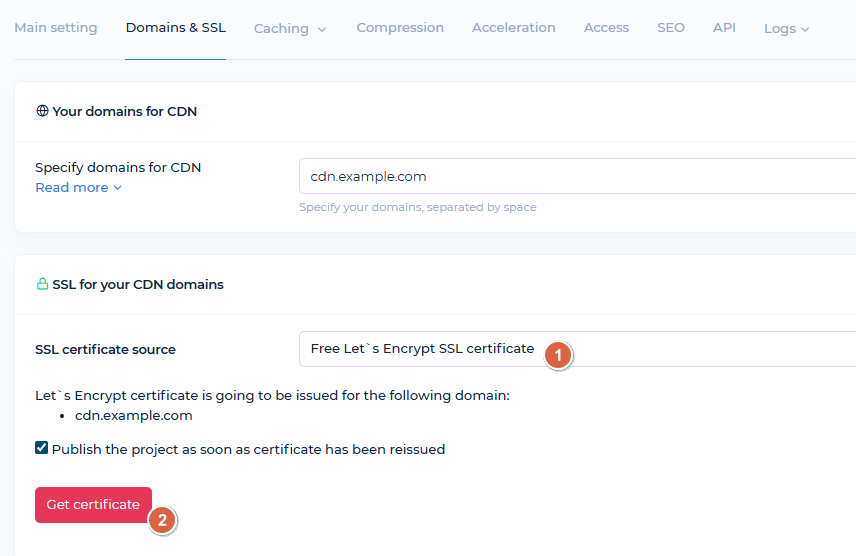
- If you checked the «Publish the project as soon as certificate has been reissued» box, the project will automatically publish after the certificate is issued, and you'll only need to wait a moment. Monitor the project status change on the main tab.
Using Your Own SSL Certificate
-
If you have your own certificate, you can add it in this section.
Select «Your own SSL certificate» from the SSL certificate source list.In the SSL section, paste the certificate body and private key. Then, click the «Generate Certificate Chain» button for proper operation.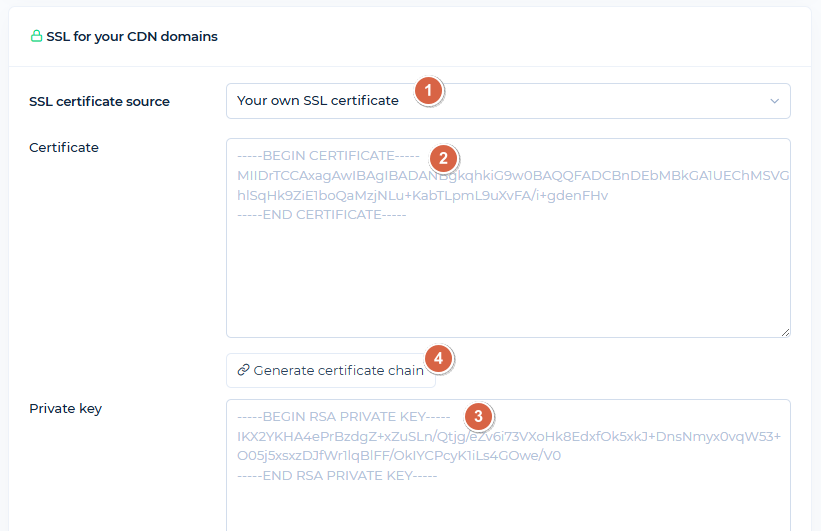
Save the changes.
HTTP to HTTPS Redirect
-
To always serve your CDN domain over HTTPS, enable redirect:

Publishing and Verifying Domain Configuration
If you haven't published the project changes yet, click «Save (without publication)» and then «Publish». Publication typically takes a few minutes.
After publishing, open your CDN domain in a browser. With successful configuration, you should see:
– Your CDN domain loads over HTTPS (if you issued/added a certificate).
– The page might display a 404 error. This is normal when only static content is cached, as the CDN domain address mirrors your site's main page (pages themselves aren't cached in this mode). You can try opening a static file through this domain.
For example, if you have a file example.com/favicon.ico
(where example.com — is your domain), that opens via the CDN service
address userXXXXX.nowcdn.co/favicon.ico,
it should also open via your CDN domain:
cdn.example.com/favicon.ico
If you enabled full caching (in the «Caching» tab), accessing your CDN domain directly will display a copy of your site's main page. If you prefer direct requests to the CDN domain to redirect to your primary domain, you can configure this in the SEO tab of your project settings in the control panel.
Your CDN domain setup is now complete. Happy optimizing!
If you have any questions about setup, maintenance, or pricing, you can always contact our support team:
- Email: sales@cdnnow.pro
- The chat at the bottom of the page