Want to set up a CDN for your website? This guide is for you if:
- Your site doesn't use a CMS;
- Your CMS doesn't have a CDN plugin, but you can configure it manually;
- You have access to your site's source code and can modify it.
Configure CDN caching for resources that don't change often but are frequently requested: images, JavaScript scripts, and CSS styles. Your website users will receive cached static files from the nearest server in the CDN network at maximum speed. The service can compress cached JS and CSS files using gzip and brotli to reduce their size.
Images can be converted on the fly to WebP format without quality loss, which can reduce image weight in the browser by up to 50%.
Creating a cdnnow! Account
To get started, submit a request to activate the CDN, providing your email and the website URL.
You will receive an email with access to the Control Panel and your unique CDN address in the format userXXXXX.nowcdn.co, where userXXXXX — is your unique identifier.
How to Check CDN Working
By default, we do not cache your website pages in our CDN unless specifically requested. Therefore, in most cases, accessing your direct CDN address userXXXXX.nowcdn.co will return a 404 error, which is normal operation.
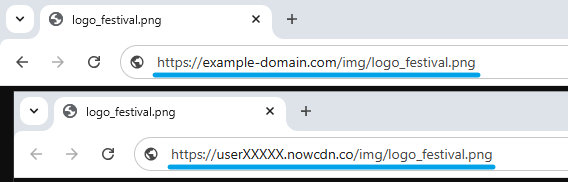
To verify CDN functionality, check static files. For example, if you have a file at
<domain>/<uri_path>, the same file should be accessible at
userXXXXX.nowcdn.co/<uri_path>
Image example:
Integrating CDN into Your Website Code
We recommend creating a website backup before starting the integration.
In your website's source code, replace the paths to static files (CSS stylesheets, JavaScript, images) with the new CDN URLs.
Example, your website code contains links to a CSS style, JS script, and image:
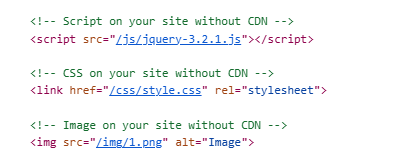
Instead of the local file path:
<link rel="stylesheet" href="/css/style.css"/>
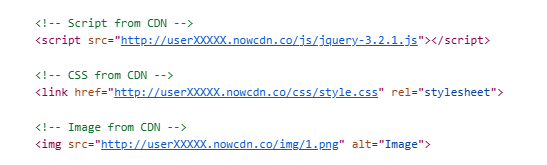
use the full CDN path:
<link rel="stylesheet" href="https://userXXXXX.nowcdn.co/css/style.css"/>
If your site uses HTTPS only, always specify the protocol:
https://userXXXXX.nowcdn.co/<uri_path>
If your site supports both HTTP and HTTPS,
omit the protocol by starting the URL with two slashes:
//userXXXXX.nowcdn.co/<uri_path>
After updating the static file paths, check your website. Refresh the page - it should look the same as before. All images, styles, and scripts should function correctly. If everything functions as expected, you have successfully integrated your site with the CDN and no further action is required.
If you encounter issues during setup, contact our specialist via chat or email.
Other methods for updating file paths depend on your website's programming
language (HTML, PHP, etc.) and require development knowledge. We do not recommend
using the <base href="https://userXXXXX.nowcdn.co/" />
tag, as it updates not only static resource paths (images, styles) but also
modifies all link addresses on your site.
Advanced CDN Configuration in cdnnow! Control Panel
Caching Other File Types (Additional Extensions)
In your project settings in the selfcare.cdnnow.pro control panel, the Caching tab lists the file types and extensions cached by the CDN:
- Images (bmp, gif, ico, jpeg, jpg, png, svg, tif, tiff, webp)
- CSS stylesheets (css)
- JavaScript (js)
- Fonts (otf, ttf, woff, woff2)
- Archives (gz, rar, z, zip)
- Audio (aac, flac, mp3, ogg, wav)
- Video (avi, flv, mkv, mp4, mpeg, oga, ogv, ogx, vob, webm)
- Embedded Objects (swf)
- API Calls (REST, SOAP) (json, wsdl, xsd, xml)
- Documents (csv, doc, docx, odp, ods, odt, pdf, pps, ppsm, ppsx, ppt, pptm, pptx, sldm, sldx, txt, xls, xlsx)
- Executables (com, exe, apk)
If specific extensions used on your site are missing from this list and you want them delivered via CDN, you can add them using either method below:
1. Contact our support team, providing your project number and the required extensions for CDN caching.
2. Enable full caching for all files (including your website pages) directly in the control panel settings. A step-by-step guide follows:
2.1. Log into your cdnnow! control panel.
2.2. Navigate to «Projects», then select your project by clicking its name in the projects table.
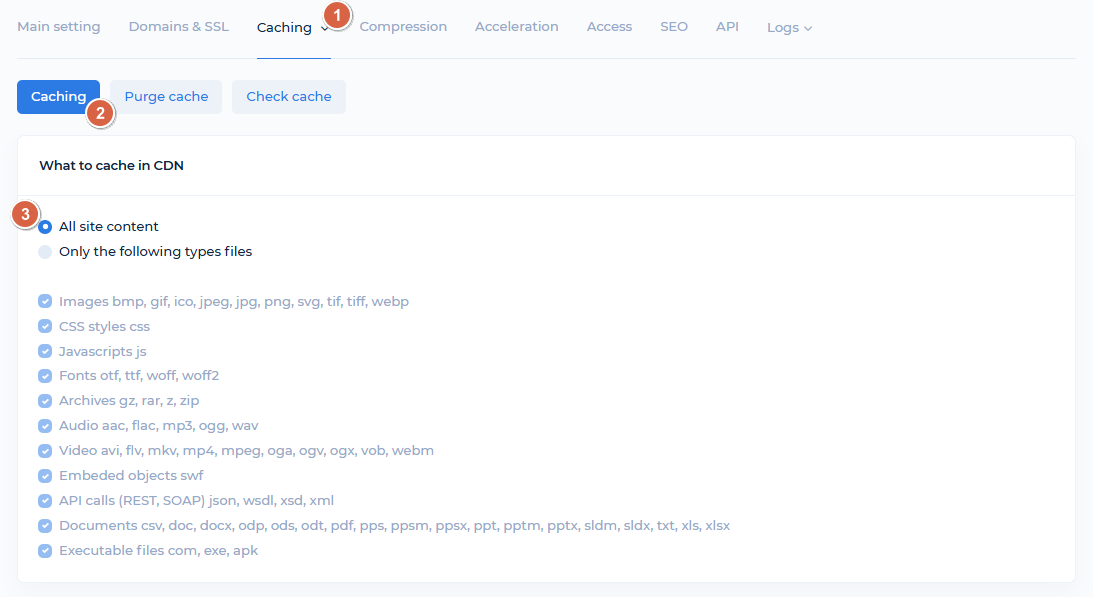
2.3. In the project settings, go to the «Caching», tab and select the «Caching» subsection.
2.4. Set the caching option to «All site content»:
2.5. Save changes (without publication).
2.6. Publish the project. Publication takes a few minutes. Once complete, all file types on your site will be available for caching.
Using a Custom Domain for CDN
If you want to use your own domain for files delivered through
the cdnnow! network (e.g.,
cdn.example.com)
instead of the default CDN project address
(userXXXXX.nowcdn.co or userXXXXX.clients-cdnnow.ru),
follow the instructions below.
- Go to your hosting/VPS control panel. The screenshots below use the cPanel hosting panel as an example.
- Open the DNS Zone Editor and Add a new CNAME record.
In the «Name» field, enter the subdomain you want to use for the CDN.
Some control panels automatically append your domain name and a trailing dot.
In this case, simply enter cdn.
In the «CNAME» field, enter your CDN project address in the format userXXXXX.nowcdn.co or userXXXXX.clients-cdnnow.ru (use your specific address from the cdnnow! Control Panel).
Save the changes. -
The new CNAME record will appear in the records table.
DNS propagation may take some time (from a few seconds up to 72 hours).

- In the selfcare.cdnnow.pro control panel, navigate to «Projects». Then, select your project by clicking its name in the projects table.
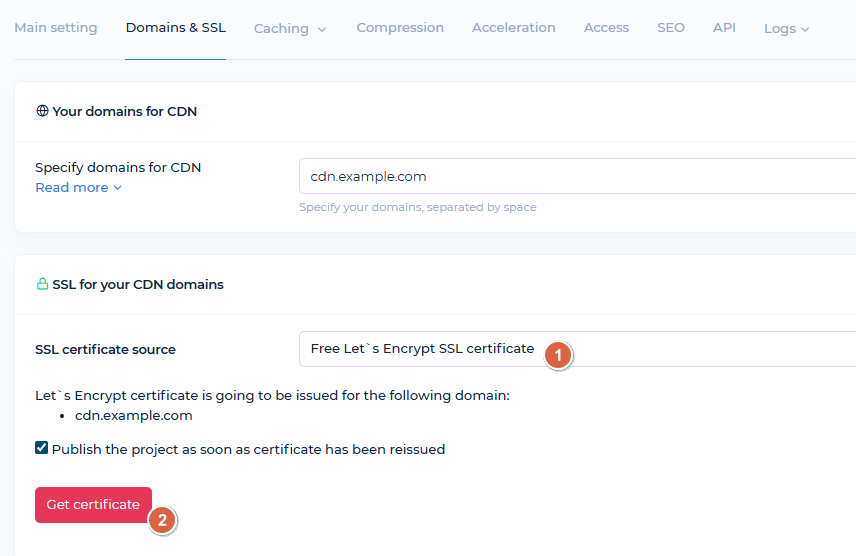
- Go to the «Domains & SSL» tab.
- Enter your CDN domain in the field. If you have multiple CDN domains, you can enter them separated by spaces (each must have a corresponding CNAME record).
- Below, you will find the SSL certificate management section.
If your website uses HTTPS, you must issue or add a certificate
for your CDN domain. Here, you can generate a free Lets'
Encrypt certificate, which will automatically renew every three months without
your intervention.
-
If you have your own certificate, you can add it in this section.
In the SSL section, paste the certificate body and private key. Then, click the «Generate Certificate Chain» button for proper operation.
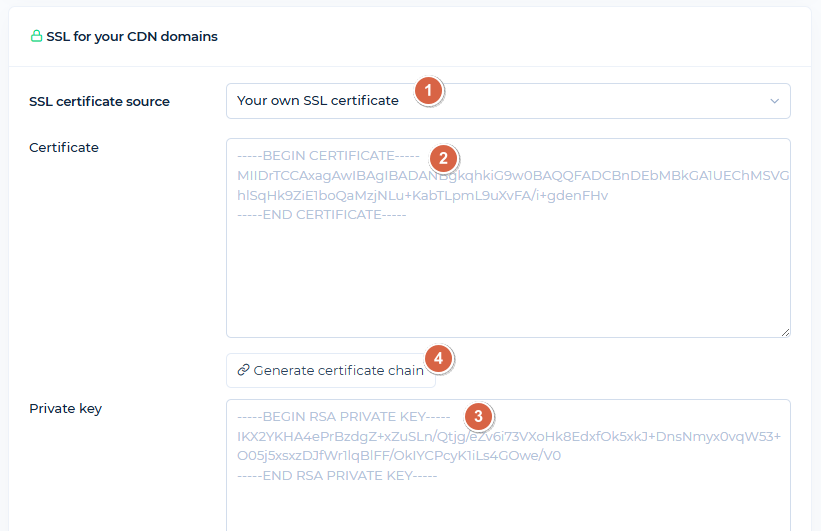
Save without publishing, and then Publish the project. -
After publishing, open your CDN domain in a browser. If configured successfully,
you will see:
– The domain cdn.example.com (your CDN domain) loads over HTTPS (if you issued/added a certificate).
– The page may show a 404 error. This is normal if only static content is cached, as the CDN domain address mirrors your site's main page (pages themselves are not cached in this mode).
– If you enabled full caching, a copy of your site's main page will be displayed. If you prefer requests to the direct CDN domain URL to redirect to your primary domain, configure this in the Control Panel under the SEO tab. Enable the «Redirect direct requests» option and specify your parent domain. Save and publish the project.

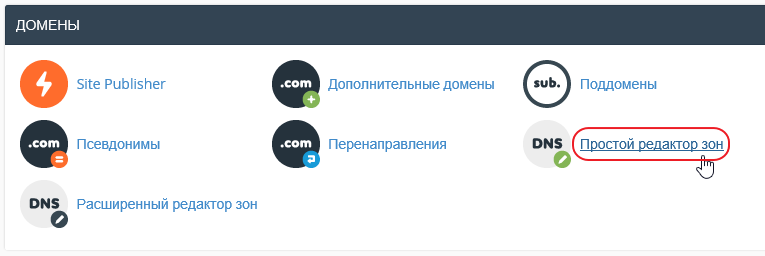
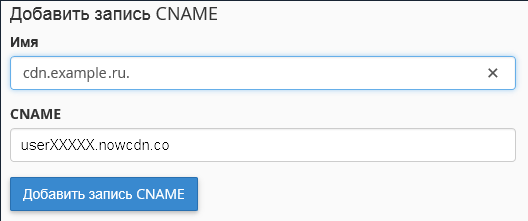
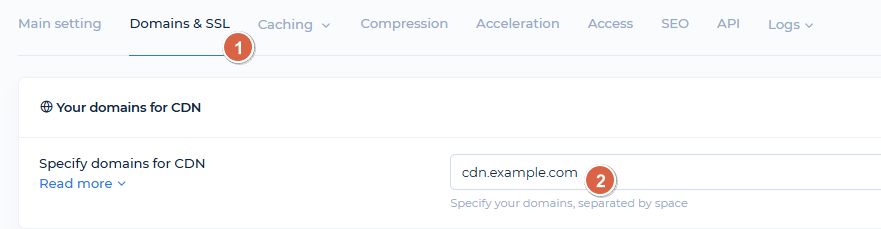
Image Optimization Setup
We have published a detailed article covering the benefits of our image optimization service. This guide will focus on how to enable this feature in your project.
In your selfcare.cdnnow.pro control panel, navigate to your project and open the «Acceleration» tab.
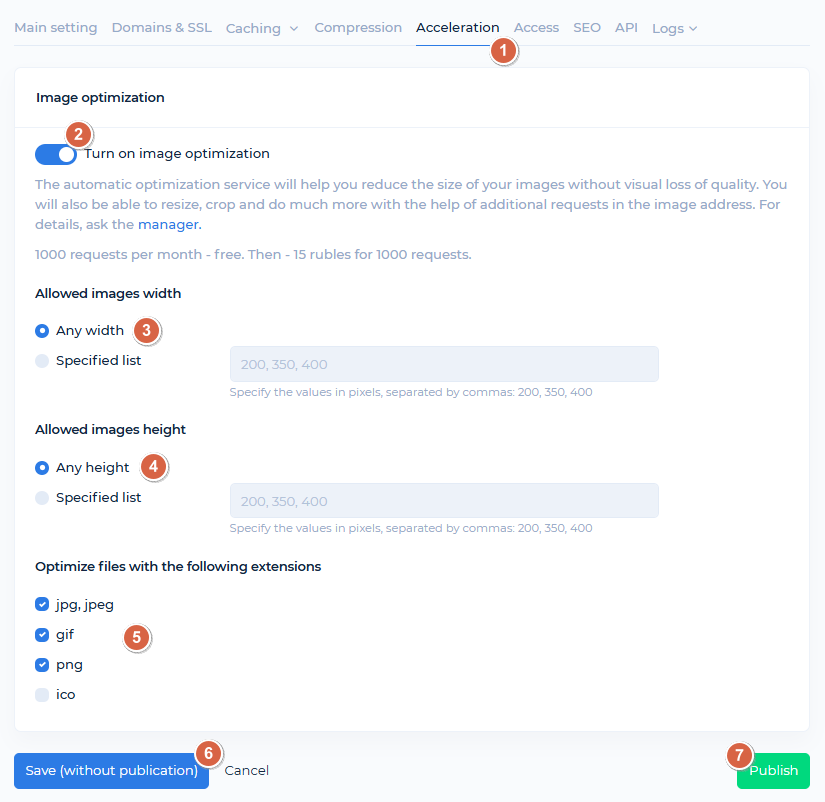
Enable the Image Optimization feature.
If you are unsure of all image dimensions on your site, leave the «Any width» and «Any height» parameters unchanged.
If you know your image dimensions, specify the appropriate values in the fields. Optimization will only apply to these sizes (items 3 and 4 in the screenshot).
Select the image extensions (item 5), you wish to optimize on your site. We do not recommend optimizing .ico files if they contain transparency.
Save (item 6) and Publish (item 7) the project.
After publishing, your site's images will load faster due to on the fly conversion to WebP format, while maintaining their original file extensions. Image file size (in bytes) will be reduced without loss of quality.
CDN Pricing
We provide all customers with a free 7-day trial. When you get access to your Control Panel you also receive unlimited access to CDN features and image optimization. During the trial period, you can fully test loading speeds—we do not limit functionality for trial accounts.
If you are satisfied with our service and are ready for long-term collaboration, we will convert your account from trial to production.
The cost of data delivery through the CDN depends on your traffic volume. You can check the traffic usage during your trial in the «Statistics» section of your control panel to estimate your expected monthly consumption. The same section displays optimization request volumes if you have enabled the image optimization feature.
CDN Plans
Starting at $8/month — includes
1000 GB. Unlimited projects
Minimum monthly prepayment of $8. Includes 1000 GB of traffic.
Excess usage is billed postpaid on a tiered pricing model. Enter your monthly traffic volume in gigabytes.
Each plan includes up to 100 000 optimization requests per month
then $1.12 / 10 000 requests
If you have any questions about setup, maintenance, or pricing, you can always contact our support team:
- Email: sales@cdnnow.pro
- The chat at the bottom of the page