Contents
- § Creating cdnnow! account
- § WordPress plugins
- § How to check if files are loading via CDN?
- § Image optimization settings
- § Costs of CDN service
It is recommended to make a backup of your CMS before starting the integration.
Submit a request for CDN connection or contact us in the chat, specifying your email, website, and CMS. Our manager will create an account for you in your cdnnow! account and set up your project. You will receive an email with instructions and the address of your project on the cdnnow network.
You've got your CDN address as userXXXXX.nowcdn.co.
Log in to your Wordpress admin panel.
To connect a CDN to WordPress, you'll need to install a plugin. There are many CDN plugins available, we can recommend the following.: CDN Enabler, LiteSpeed Cache. Below we'll review them in details.
W3 Total cache plugin recently disabled the possibility
to connect third-party CDN services
WP Fastest Cache is a good plugin to
speed up your site, but for this you need to change some settings in you personal account cdnnow!.
If you choose to use WP Fastest Cache, please contact our support team,
we'll come with advices on proper configuration.
CDN Enabler
Plugin can be found here: https://ru.wordpress.org/plugins/cdn-enabler/
Author: KeyCDN
Pros: free, very simple CDN setup, nothing extra.
Installation and configuration
In your Wordpress admin panel navigate to «Plugins → Add new» and enter «CDN Enabler» to the search field.
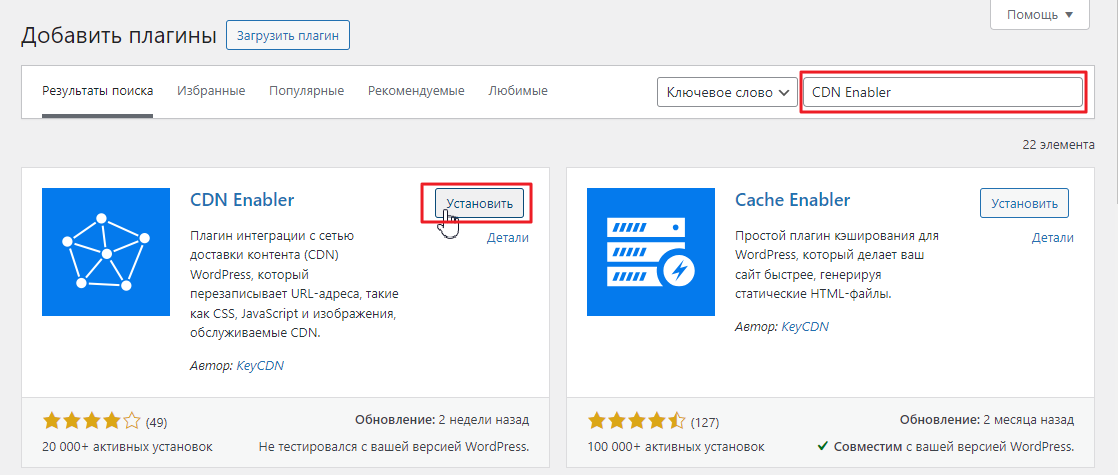
Click «Install», and then — «Activate».
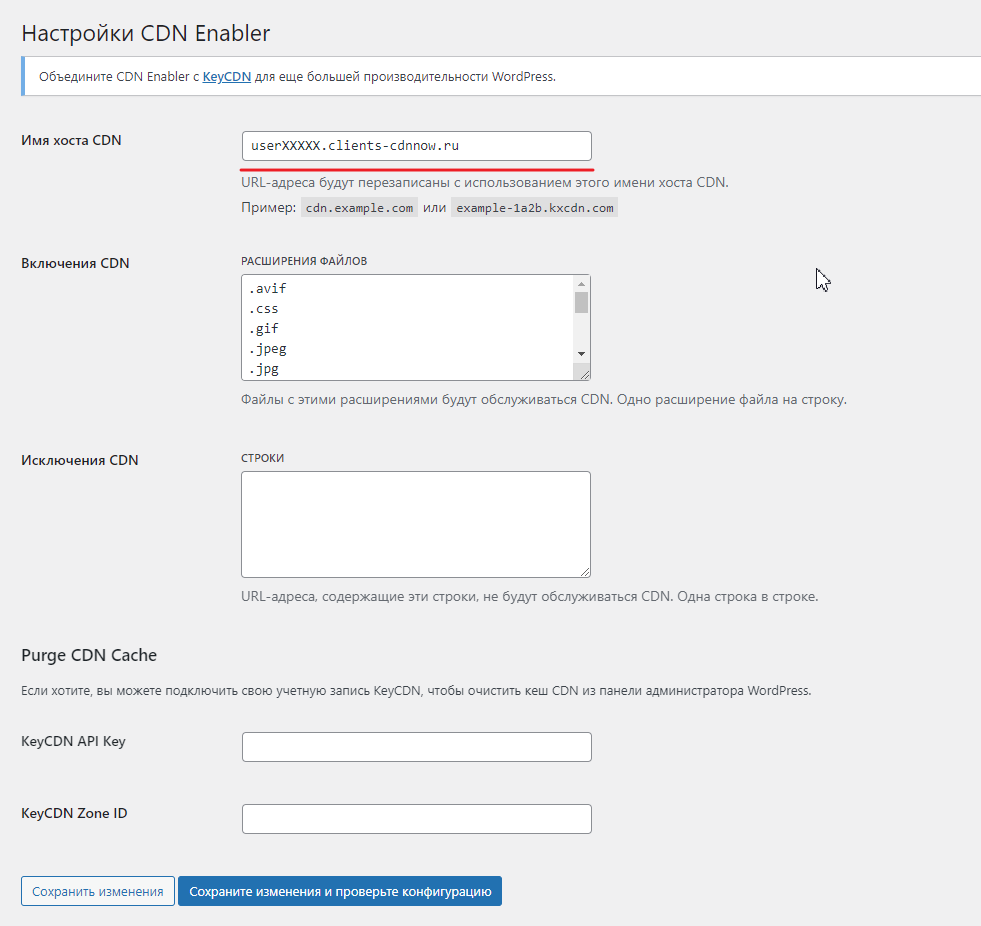
After activation navigate to «Plugins → Installed» section, then click Settings/Configuration on this plugin.
The configuration is very simple — only one field «CDN host name» should be filled with the address, we you received from us userXXXXX.nowcdn.co (where ХХХХХ is your unique name).
Attention! Please provide the address without the protocol (http/https).
Instead of service domain userXXXXX.nowcdn.co you may use your own domain for CDN. Please check our artice for details.
All the main file extensions for caching are already added to the "CDN Inclusions" field.
If you want to add another extension to the list, be sure to check your cdnnow! Personal Account
and verify that the extension is cached by the CDN.
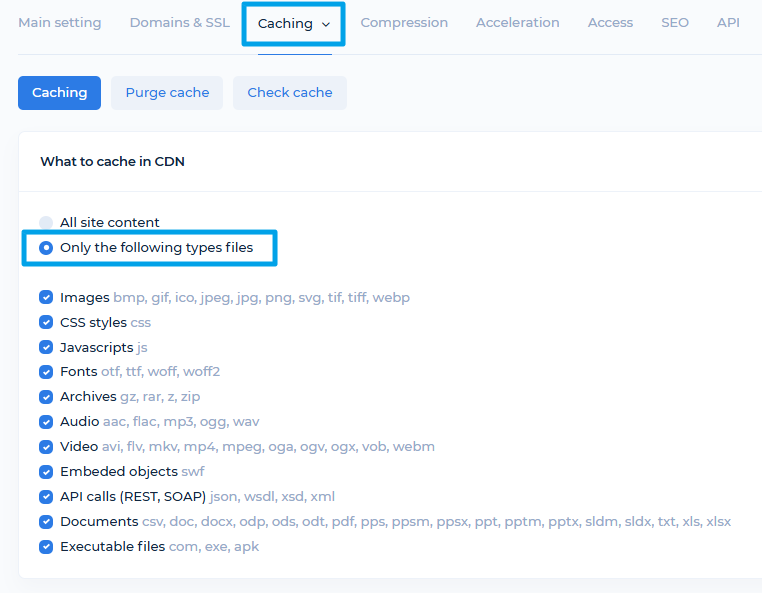
You can do this in your project settings, under the "Caching" tab. There's a list of file
types to cache. If the extension you need isn't there, —
contact our support team, we'll add them.
If you want to exclude certain extensions from caching, you need to do so in two places:
- In your cdnnow! account, on the Caching tab of your project settings, uncheck the box for a specific file type, save and publish the project.
- In the CDN Enabler plugin, remove that file type from the "CDN Enables" list, and save the changes.
The remaining plugin fields can be left blank.
To save your changes, click "Save Changes."
When using the "Save Changes and Test Configuration" button, you may receive an error stating that the CDN URL is unavailable (404). This is normal behavior. Simply use the "Save Changes" option without checking the configuration.
After saving, go to your site, refresh the page, and check that it displays correctly.
We wrote how to verify that files are now loading through the CDN at the end of the article.
LiteSpeed Cache
Link to the plugin page: https://wordpress.org/plugins/litespeed-cache/
Author: LiteSpeed Technologies
Advantages: Free, over 5 million installations, numerous caching and speed optimization settings.
Installation and configuration
In your WordPress admin panel, go to the "Plugins → Add New" menu and enter "LiteSpeed Cache" in the search field.
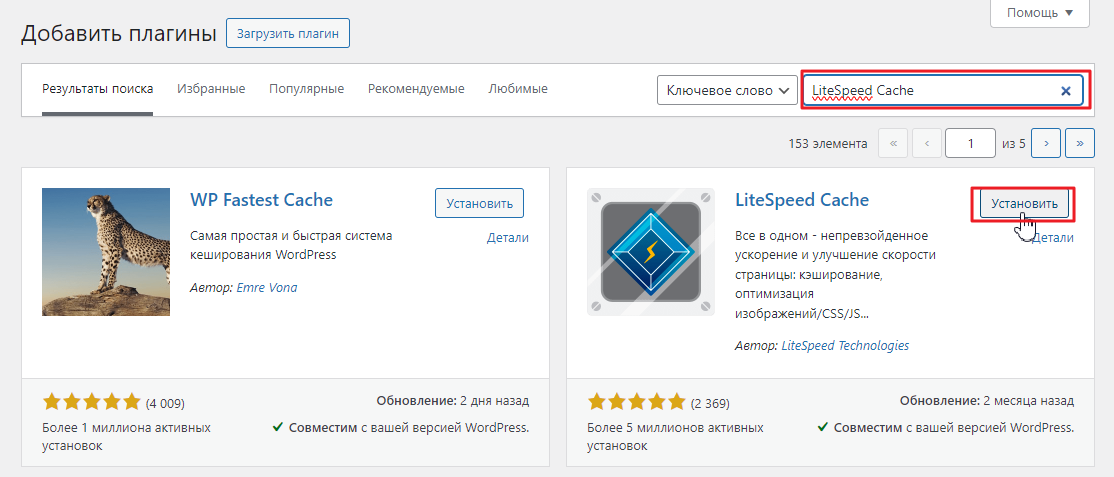
Click “Install” for the plugin, and when installed, click “Activate”.
When activated, go to the "Plugins → Installed" section, where you should click the Settings/Configuration link for this plugin.
This plugin's capabilities are extensive. We won't cover other plugin settings,we'd better concentrate on how to connect to our CDN service.
To connect to the CDN, you need to go to the plugin menu in the WP side menu, then to the CDN item.

In the CDN settings tab, you need to:
1. The first switch should be OFF, and the second one ON (Use CDN Mapping).
2. In the "CDN URL" field, enter your CDN service domain with the https protocol
(or your configured CDN domain, such as https://cdn.example.com, where example.com is your website's primary domain).
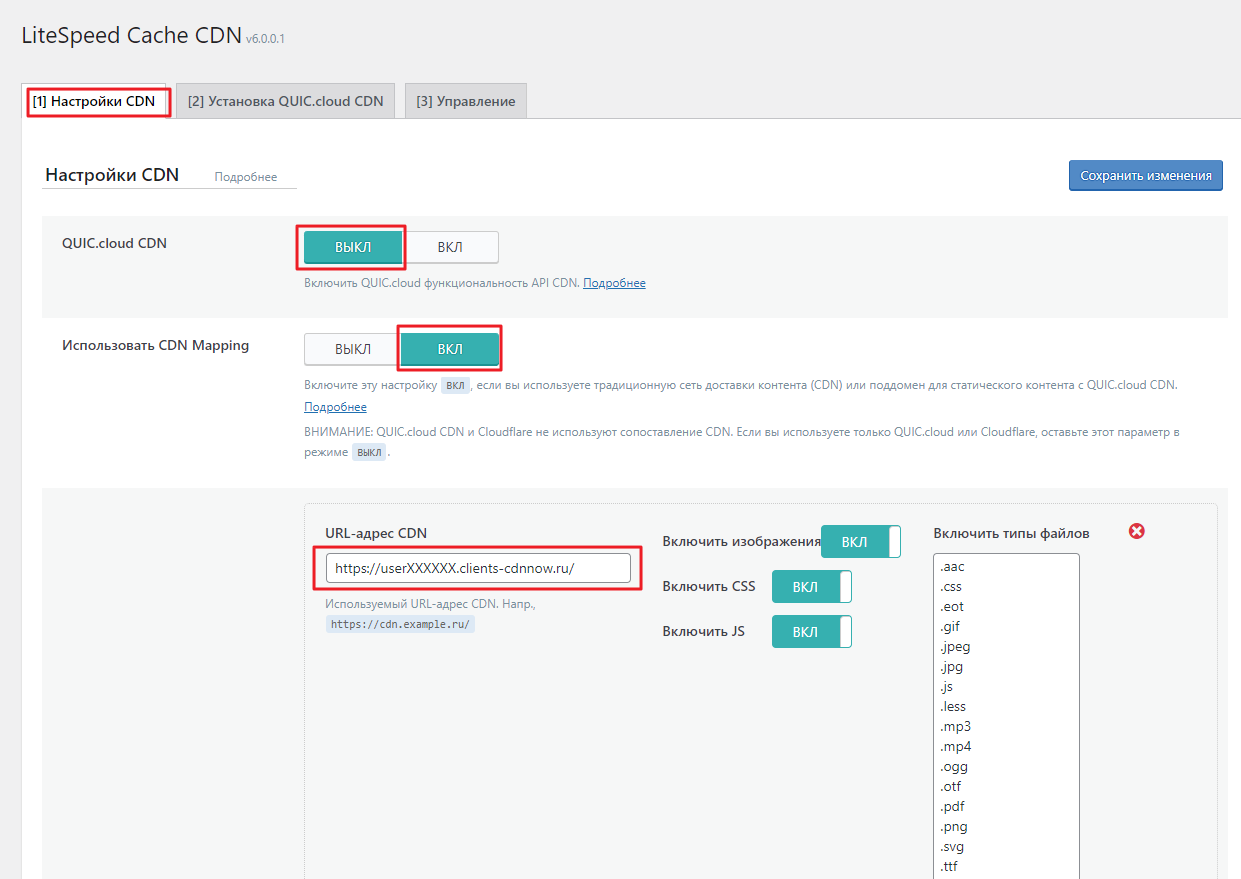
Instead of the service domain userXXXXX.nowcdn.co, you can use your own domain for the CDN. For instructions on setting it up, read our article.
On the right side of the settings page, the file types for caching are filled in.
If you want to add a different extension to the list, be sure to check your cdnnow!
Personal Account and ensure that the extension is cached in the CDN.
You can do this in your project settings, under the "Caching" tab.
There you'll find a list of file types to cache. If the extension you
need isn't listed,
contact support, and we'll add it.
If you want to exclude certain extensions from caching, you need to do so in two places:
- In your cdnnow! Control Panel, go to the Caching tab in your project settings, uncheck the specific file type, save, and publish the project.
- In the plugin, remove that file type from the "File types to enable" list and save the changes.
The remaining settings can be left as they are.
To apply the changes, click "Save Changes".
After saving, go to your site, refresh the page, and verify that it displays correctly.
How to Verify Files Are Loading via CDN
Open your website and launch Developer Tools (F12).
In the Elements panel (Inspector), you can see the site's source code. File URLs—such as scripts, CSS styles, and images—should now point to new addresses starting with your CDN domain.
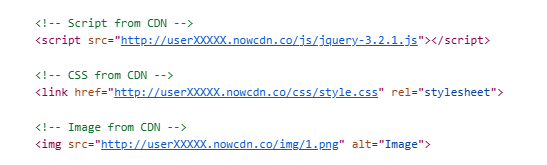
Your website users will now receive these files from our network—delivered from the server nearest to them.
The setup is now complete, and your CDN is ready for use.
Images can be converted on the fly to WebP format without quality loss, which can reduce image weight in the browser by up to 50%.
Image Optimization Setup
We've published a detailed article about the benefits of our image optimization service. Here, we'll describe how to enable this feature in your project.
In your selfcare.cdnnow.pro Control Panel, navigate to your project and open the «Acceleration» tab.
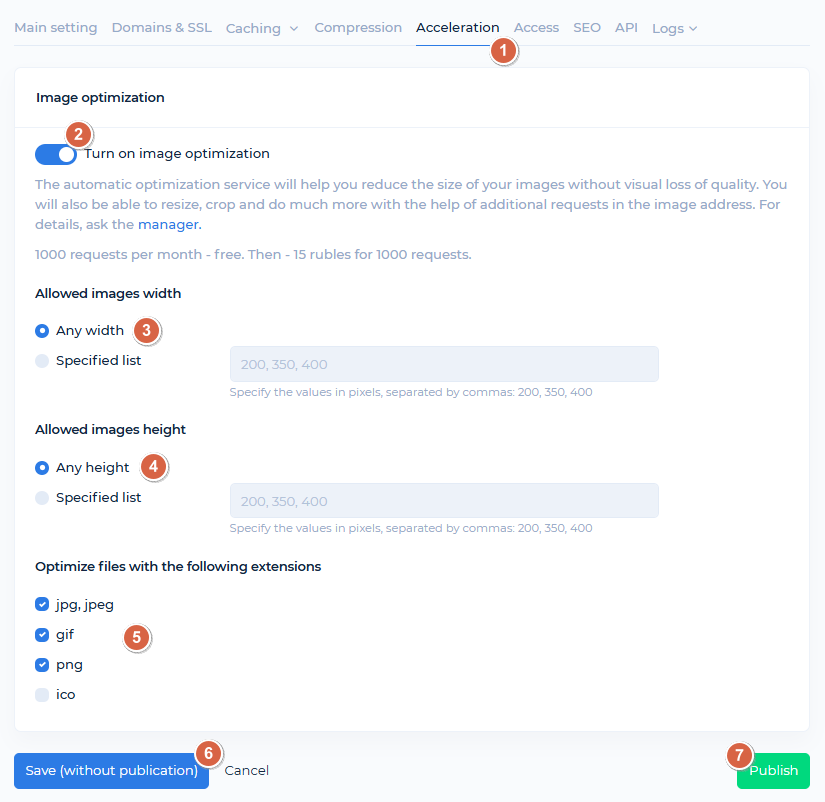
Enable the Image Optimization feature.
If you're unsure of all image dimensions on your site, leave the «Any width» and «Any height».
If you know your image dimensions, specify the appropriate values in the fields. Optimization will only apply to these sizes (items 3 and 4 in the screenshot).
Select the image extensions (item 5) you want to optimize on your site. We recommend excluding .ico files if they contain transparency.
Save (item 6) and Publish (item 7) the project.
After publishing, your site's images will load faster due to on the fly conversion to WebP format while maintaining their original file extensions. Image file size (in bytes) will be reduced without loss of quality.
Cost of CDN services
We provide a free 7 days trial for all our new clients. When you get access to your personal account you also get unlimited access to CDN and image optimization features. During the trial period, you can thoroughly test the download speed; we do not limit the functionality for trial accounts.
If you like our service and are ready for long-term cooperation, we will convert your account from trial to normal.
The cost of placing data in CDN depends on the amount of traffic. You can check your traffic usage during the trial period in your personal account in the «Statistics» section and calculate how much traffic is expected per month. In this section, you can see the volume of requests for image optimization, if you have enabled this feature.
Plans
Starting at $8/month — includes
1000 GB. Unlimited projects
Minimum monthly prepayment of $8. Includes 1000 GB of traffic.
Excess usage is billed postpaid on a tiered pricing model. Enter your monthly traffic volume in gigabytes.
Each plan includes up to 100 000 optimization requests per month
then $1.12 / 10 000 requests
If you have any questions about setup, maintenance, or pricing, you can always contact our support team:
- Email: sales@cdnnow.pro
- The chat at the bottom of the page